|
|
Installing mIRC for Windows95/98/2000/XP
STEP ONE : Download the mIRC program.
mIRC is distributed in a self-extracting file that will install mIRC on your PC.
You dont need any external programs to install and setup mIRC on your PC, just follow
the instructions below.
mIRC is available in a 16 bit and 32 bit version. The 16 bit version (for Windows 3.11) is no longer supported or updated by the author of mIRC. These instructions will deal only with installation of the 32 bit version which is for Windows 95, 98, 2000, and XP. Who really runs Windows 3.11 anyway??
Download the mirc 6.16 file and save it to
your hard disk. The file is named: mirc616.exe
When you see the dialog that says "Would you like to open the file or save it to your computer," click on Save.
|
|
|
STEP TWO : Installing mIRC
Once you have downloaded a mIRC file, you are ready to install mIRC in windows.
During the install procedure mIRC's files will be automatically extracted from the
file and all necessary steps for starting mIRC will be taken. If you're upgrading an
older version of mIRC you will be able to keep all your old settings.
- Open the File Manager.
- Locate the mirc 6.16 file which you just downloaded and saved to your computer. It will be named named mirc616.exe
- To start the installation process just double click on the file name. The installation
program will be started automatically.
- Determine the place on your harddisk where you want mIRC to be installed.
Normally the proposed c:\mirc will do fine. Upgraders just browse to the directory where
their current mIRC version is found and select that as destination directory.
-
- If you want the installer to keep backup copies of all eventual older files, keep
the "Make backups" option selected.
-
- If you want the installer to add a mIRC program group to windows and set up the
mIRC icons, keep the "Add icons" option selected.
|
- Select 'OK' and you're done! The installer will take care of all the work.
|
|
|
STEP THREE : Setting up mIRC
Now that mIRC is installed on your PC, this is what is required to set it up:
- First make sure your winsock is active. Normally you just have to set up a connection
to your provider to do so. Always first start your dialer and then mIRC.
- Double click the mirc icon (shortcut) to start up mIRC.
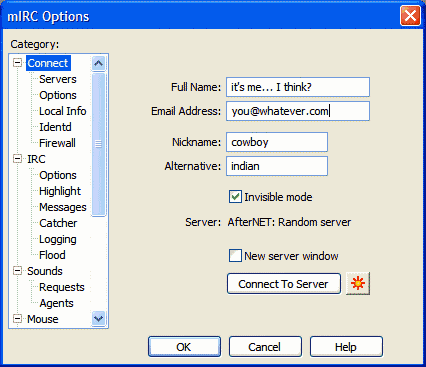
- Click on the Options icon or click on File/Connect from the menu bar and the following window box will appear:

- Make sure that Connect in the Category box is highlighted by clicking on it. Enter the following information in the fields
Full Name: Your real name (fake it if you like)
E-Mail: Your email address (the real address is required for mIRC to work properly)
Nick Name: A one to nine character alias to use on the chat system (ie, a nickname)
Alternate: If someone else is already using the Nick Name you've chosen on IRC,
you will be known by this alternate name instead. (ie, a second choice for your nickname)
You also have to select a local or nearby IRC server. A long list of servers is available by
default. Just select one. .
- Next, highlight Local Info. Normally you dont have to fill in anything here.
Just make sure the boxes under 'On Connect, Always get :' IP Address and
Local Host are Checked (selected). For various Internet Providers and PC setup's you might
need other settings here. Dont worry too much for now, if you get problems later just read
the help provided on this topic in the mIRC Help file (mirc.hlp).
- Now highlight Identd and Enable the Identd Server. Your User ID should
already be filled-in there. Eventually fill in your Account Name in this field. (Your account
name is the part before the @ in your email address, like biscuits in this example)
The system should allways be set to UNIX and Listening on port 113.
- Once this is all set, click on the OK button to close the mIRC Setup Dialog.
- mIRC is now set up and totally ready to use.
|
|
|
|
STEP FOUR : Using mIRC
- Click on the File menu and select Connect. (Or select the lightning button in
the Toolbar)
- After a short wait (up to 20 seconds) you will see some meaningless
blurb appear in the status window.
- The last line will say something like "End of MOTD command".
You are on IRC now !! Congratulations.
- To join a conversation, type the /join {channel_name} command in the single line
box at the bottom of the Status window. Popular channels are #42plus, #friendly, #mirc,
#teen, #hottub, #england, #usa, well there are thousands. To get a listing of all available
channels you might try the /list command.
-
- When you join a channel, a new window will appear on your screen.
-
- The names on the right side column are those people who are currently joined in the
channel.
-
- The left hand window is where everyone's conversation takes place.
-
- To say things to the people joined to the channel, just type your comments
in the single row box at the bottom of the channel's window.
-
- To leave a channel, just double click on the close box, which is located at the top-left hand corner of the channel name's window.
|
|
|
|
|


